Last updated on January 8th, 2025 at 08:34 pm
So, you’re ready to claim your spot on the internet! As an affiliate marketer, securing your domain name is the first step toward building a professional and trustworthy online presence. Your domain is your brand’s virtual real estate—the place where people can find you, learn from you, and engage with your recommendations.
Namecheap is a top choice for many affiliate marketers, being known for affordable pricing, a simple, user-friendly setup, and some great extras—like free privacy protection. Namecheap makes the process so easy that even if you’re new to all this, you’ll be able to register your domain in just a few clicks.
In this guide, we’ll show you how to purchase a domain on Namecheap, specifically with affiliate marketing in mind. By the end, you’ll know exactly how to find the right domain, pick the best options for your niche, and get it ready for your website. Let’s dive in and get that domain name locked down!
Affiliate Disclosure: This post may contain affiliate links, which means we may earn a commission at no extra cost to you if you make a purchase through one of these links. We only recommend products and services that we believe will add value to our readers. For more details, please read our full affiliate disclosure. We appreciate your support!
Step 1: Go to Namecheap’s Website and Search for Your Domain
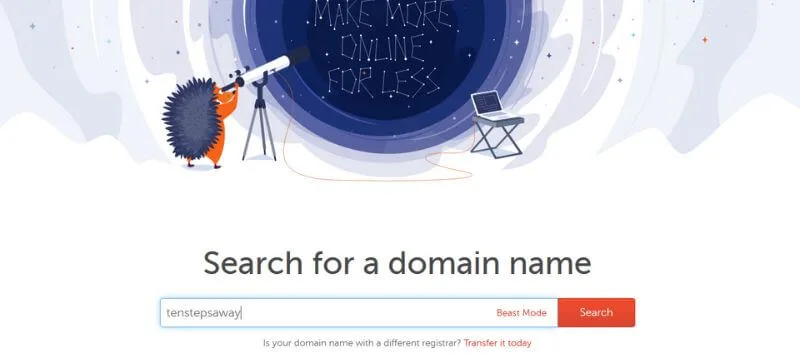
Owning a memorable domain name is a must for affiliate marketing. Your domain is like your online business card—it’s the first thing people see and helps establish your brand’s credibility. To get started, head to Namecheap’s website and navigate to the search bar at the top of the page. This is where you’ll type in the domain name you have in mind. Here’s a quick overview of the process:
- Type Your Desired Domain Name: Think of this as the name of your affiliate marketing brand. It should be memorable, ideally short, and easy to type. A great domain can make it easier for potential clients and partners to find you and engage with your content.
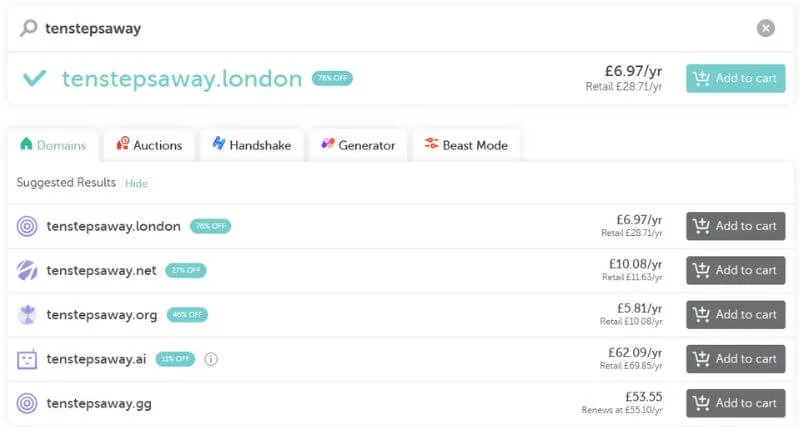
2. Check Availability: Once you enter your domain name, Namecheap will check if it’s available. If it’s taken, don’t worry! You’ll see a list of alternative names or suffixes that might also work for an affiliate site. These extensions, like .net or .org, are correctly termed your “top-level domain” or TLD.
3. Choosing the Right Domain Name:
- Keep It Simple: Shorter domain names are generally easier to remember and look more professional—especially valuable in affiliate marketing, where building trust is key.
- Avoid Special Characters: Stick to letters and numbers—special characters like hyphens or underscores can be confusing and may make your domain harder to remember.
- Use Keywords for Your Niche: If possible, choose a domain name that includes a keyword related to your affiliate niche, like “health,” “finance,” or “travel.” This helps with SEO and quickly conveys your site’s focus to visitors and potential partners.
Avoid Keyword Overloading in Domain and URLs: Including a keyword related to your niche in your domain can be beneficial, but doubling up on similar keywords may harm your SEO. For example, a domain like besttraveltips.com paired with an article titled “Best European Travel Tips” could create a URL like besttraveltips.com/best-european-travel-tips, which might be flagged as keyword stuffing. Instead, choose a domain name that complements your brand without repeating keywords from your content, such as worldwidewandering.com, and write article titles that keep URLs clean and user-friendly (e.g., worldwidewandering.com/european-travel-tips). This approach avoids redundancy, enhances user experience, and prevents potential SEO penalties.


Step 2: Select Your Domain and TLD
Choosing the right TLD can make a difference. Here’s what to keep in mind:
- Popular Suffixes:
- .com: The most widely recognized and trusted suffix. It’s often the go-to choice, especially for affiliate marketing, as it gives your site a professional and established feel.
- .org: Commonly used by non-profits and organizations. If your affiliate site has an informational or community focus, .org can be a solid option.
- .net: Another versatile choice often used by tech or network-focused sites. If .com isn’t available, .net can be a good alternative.
- Country-Specific Suffixes:
- If your affiliate marketing targets a specific country, a country-specific TLD like .co.uk (UK) or .ca (Canada) may help with local SEO and resonate better with your target audience. Namecheap offers these options as well, which is handy.
- Newer, Niche-Specific Options:
- In recent years, many niche-specific TLDs have become available, like .io for tech, .ai for artificial intelligence, or .shop for e-commerce. These suffixes can give your domain a unique edge if they align with your niche. Just keep in mind that while they stand out, they may not be as immediately recognizable as .com or .org.
- Pricing and Discounts:
- Namecheap often shows discounted prices for certain suffixes, and you can find some great deals. If your preferred TLD is available with a discount, you’ll see the savings marked next to the price (as shown in the screenshot below).
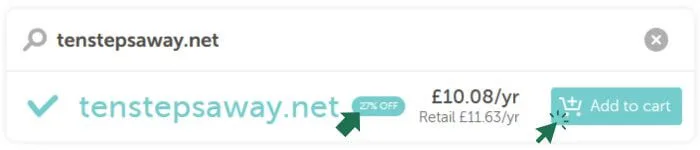
After considering these factors, click the “Add to Cart” button next to the domain and suffix combination you want. This will add it to your shopping cart, and you’ll be ready to proceed with securing your domain!

Step 3: Choose Add-Ons to Enhance Your Domain
After adding your chosen domain to the cart, Namecheap will show you some optional add-ons you can purchase with your domain. These add-ons can improve your website’s functionality, security, and visibility—important factors for any affiliate marketer. Here’s a quick overview of the options available and which ones might be worth considering:
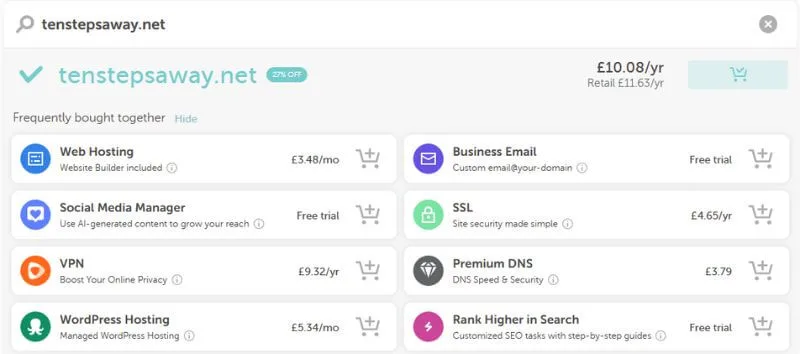
- Web Hosting: Namecheap’s hosting packages are an affordable way to get started. You’ll need hosting to actually build and display your website. If you’re setting up a WordPress site, the managed WordPress Hosting option simplifies the setup process.
- Business Email: A custom email address matching your domain (e.g., [email protected]) will help you look more professional.
- SSL: An SSL certificate is essential for any website. It encrypts data, ensuring that sensitive information stays secure, and it signals trustworthiness to visitors through the padlock icon in the URL bar. Moreover, SSL is a ranking factor for search engines, making it a critical component for improving SEO. Namecheap offers affordable SSL certificates, making it easy to secure your site and establish credibility.
- Social Media Manager: This tool can help you manage your social media content with AI assistance, which is helpful if your affiliate marketing strategy includes social media promotion. There’s a free trial available, so you can explore it before committing.
- VPN: A VPN, or Virtual Private Network, is more about personal security and privacy. It’s not essential for running a website, but it’s useful if you want extra protection when accessing your accounts or managing your site from different locations.
- Premium DNS: Premium DNS focuses on ensuring 100% uptime and providing reliable worldwide coverage for your domain. It offers enhanced security and stability, making it a valuable choice for sites that anticipate high traffic or require consistent availability. While not essential for beginners, Premium DNS can be an excellent upgrade as your website grows.
- Rank Higher in Search: This SEO tool offers step-by-step guides to help your website rank better on search engines. For affiliate marketers, SEO is crucial for attracting organic traffic, so this might be worth trying, especially if you’re new to SEO.
Each add-on has a price displayed, along with any available discounts or free trials. Consider your website’s needs and budget to decide which options make sense. If you’re just starting, you may want to begin with only the essentials and add more as your site grows.
Once you’ve chosen your add-ons (or skipped them), you’re ready to proceed to the checkout!
Step 4: Complete Your Purchase
With your domain and any optional add-ons selected, you’re ready to complete the purchase. This final step is straightforward, and Namecheap makes the checkout process easy to follow. Here’s what to expect:
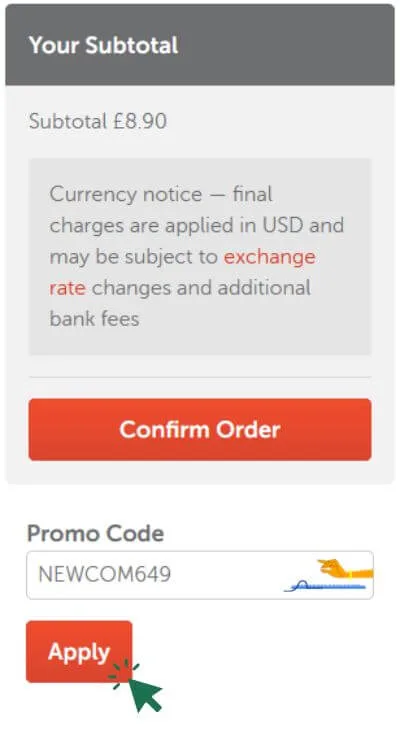
- Review Your Cart: Take a moment to review your cart. Double-check that you have the correct domain and any add-ons you’ve chosen. You’ll see a total cost summary here, including any discounts applied. You can adjust your selections before proceeding if you change your mind about any items.
- Apply a Promo Code (If Available): If you have a Namecheap promo code, now’s the time to enter it. You can often find discounts on domains or hosting, so keep an eye out for deals that might reduce your total cost. Namecheap frequently offers promotions, which can be especially useful when you’re getting started.
- Good news! You can use our coupon code to get a great deal on your domain:
- To apply the code, enter NEWCOM649 in the promo code box during checkout and watch the price drop. This is a fantastic way to save on your new domain, especially if you’re just starting out with affiliate marketing.
- Proceed to Checkout: Click the “Confirm Order” or “Checkout” button to move to the payment page. You’ll be prompted to create an account if you’re new to Namecheap.
- Payment Information: Enter your payment details. Namecheap accepts various payment methods, including credit cards, PayPal, and even cryptocurrency. Choose the payment option that works best for you, and follow the prompts to enter your information securely.
- Confirm and Place Order: Review the final summary, ensuring your coupon code has been applied, and click “Pay Now” or “Place Order” to complete your purchase. You’ll receive a confirmation email from Namecheap with details of your purchase, including a receipt and instructions for managing your new domain.
- Access Your Domain: Once the purchase is complete, log in to your Namecheap account and go to the Dashboard. Here, you can see your new domain, manage any add-ons, and access settings for linking the domain to your web host.
With your new domain secured, you officially own a unique web address! The next step is linking it to your web host so you can start building your website and kick-start your affiliate marketing journey.
Step 5: Enable WhoisGuard Privacy Protection
When you purchase a domain, your personal information—such as your name, address, email, and phone number—may be publicly visible in the WHOIS directory. This directory is a global domain ownership database; without privacy protection, your information is accessible to anyone who looks up your domain. For affiliate marketers, keeping your contact details private is desirable for protecting your identity and avoiding spam.
With Namecheap, you get free WhoisGuard Privacy Protection, which keeps your personal information hidden from the public WHOIS database. Here’s how to make sure it’s enabled:
- Review the WhoisGuard Option: After adding your domain to the cart, check that the WhoisGuard option is enabled by default. This option should appear at no extra cost.
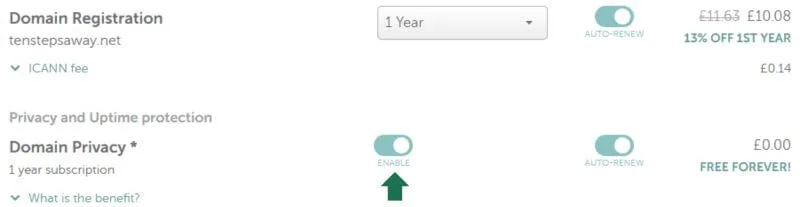
2. Confirm at Checkout: Double-check that WhoisGuard is selected before finalizing your purchase. Namecheap will automatically apply it for free, but it’s always good to confirm.
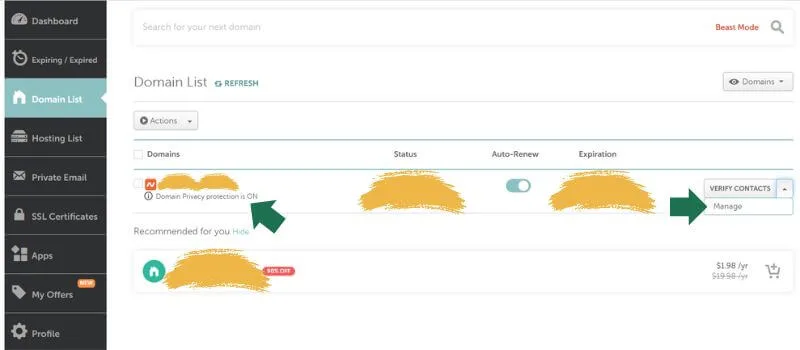
3. Manage WhoisGuard in Your Dashboard: Once your purchase is complete, you can manage WhoisGuard settings from your Namecheap dashboard under Domain List > Manage. If you ever need to make changes, you can toggle WhoisGuard on or off.

With WhoisGuard privacy protection, you can secure your domain and keep your personal information private, giving you peace of mind as you build your affiliate marketing site.
Step 6: Link Your Domain to Your Web Host
Now that you’ve secured your domain, the final step is to connect it to your web hosting provider so your site can go live. If you’re using a third-party hosting service, you’ll need to adjust the DNS settings in your Namecheap account to point to your hosting provider. Alternatively, the setup is even more straightforward if you’re using Namecheap’s hosting. Here’s how to do both:
Option 1: Using a Third-Party Web Host
- Log In to Namecheap: Go to your Namecheap account dashboard and navigate to the Domain List on the left-hand menu.
- Find Your Domain: Locate your purchased domain and click on Manage.
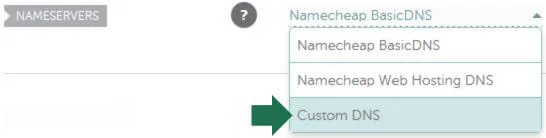
- Update DNS Settings: Under the Nameservers section, select Custom DNS. Enter the nameservers provided by your web host (usually found in your hosting account or welcome email).
- Save: Click the green tick to update the settings.
- Propagation Time: DNS changes can take up to 24–48 hours to fully propagate, so your site may take a little time to appear live.

Option 2: Using Namecheap Hosting
- Add Hosting to Your Domain: If you’ve also purchased Namecheap hosting, your domain and hosting should be automatically linked.
- Verify Connection: Go to your Namecheap dashboard, find your domain under Domain List, and select Manage. Check the Nameservers section to ensure they’re set to Namecheap BasicDNS. This is typically the default setting for domains registered and hosted with Namecheap.

- Set Up Your Site: With your domain and hosting linked, you can now proceed to install WordPress, set up your website, and start building your affiliate content.

Connecting your domain to your web host is the last step before you’re ready to start publishing content. Once your site is live, you’ll be ready to start affiliate marketing and begin sharing valuable content with your audience!
Tips for Choosing a Good Domain Name
Choosing the right domain name is essential, especially if you’re starting an affiliate marketing site. Your domain is often the first impression visitors have of your brand, so you want it to be memorable, relevant, and easy to type. Here are some key tips to help you make the best choice:
- Keep It Short and Simple: Shorter names are easier to remember, type, and share. Aim for a domain name that’s concise and straightforward. Ideally, try to keep it under 15 characters if possible—something that rolls off the tongue and sticks in people’s minds.
- Avoid Special Characters and Numbers: Stick to letters only. Using numbers or hyphens can make it harder for people to remember and may lead to confusion. For example, people may wonder if “3rdStreet” should be typed with the number or spelled out, or they might forget where to place a hyphen.
- Use Relevant Keywords for Your Niche: Include a keyword related to your niche if possible. For instance, if you’re in the health and wellness space, try to incorporate words like “health,” “fit,” or “wellness” in your domain name. Keywords can help with SEO (search engine optimization) and give visitors an immediate sense of your site’s focus.
- Consider Your Target Audience: Think about the people you want to attract. For an affiliate marketing site, you may want a professional, brandable name that inspires trust. Choose words that reflect the tone and message of your content and resonate with your audience.
- Check for Trademarks and Social Media Availability: Before finalizing your domain, make sure it’s not trademarked by another business. A quick Google search can help you avoid legal issues. Additionally, check social media platforms to see if your domain name (or a close version) is available as a handle. Consistency across platforms can strengthen your brand identity.
- Pick a .COM (If Possible): .COM domains are the most widely recognized and trusted. While other suffixes are gaining popularity, .COM is still the top choice for credibility. If .COM isn’t available, consider .net or .org, or try creative alternatives.
- Think Long-Term: Choose a name that will grow with your business. Avoid something too specific or trendy that might limit you down the road. Ideally, your domain should still make sense as your site evolves and expands in the future.
- Test for Pronunciation and Spelling: Say the domain out loud and ask others to spell it. If it’s challenging to say or spell, it might be better to choose something simpler. You want your domain to be easily shareable by word of mouth without confusion.
With these tips, you’ll be better equipped to choose a domain name that stands out, aligns with your niche, and strengthens your affiliate brand. Once you’ve found the perfect name, you’re ready to make it yours!
Quick Pros and Cons of Using Namecheap
Choosing the right domain registrar is essential for a smooth start as an affiliate marketer. Namecheap is a popular choice, especially for beginners, but like any service, it has its strengths and areas for improvement. Here’s a quick rundown to help you decide if it’s the right fit for your needs:
Pros
- Affordable Pricing: Namecheap offers competitive pricing on domains with frequent discounts and deals—perfect for getting started without a high upfront cost.
- Free WhoisGuard Privacy Protection: Namecheap includes free WhoisGuard for most domains, which keeps your personal information private and protects against spam—an added bonus that many registrars will charge you for.
- User-Friendly Interface: Namecheap’s dashboard is intuitive and easy to navigate, making it simple to manage your domains, even if you’re new to the process.
- Reliable Customer Support: Namecheap provides 24/7 customer support via live chat, which is handy if you encounter any issues or have questions.
- Wide Range of Add-Ons: From SSL certificates and email hosting to VPN services, Namecheap offers useful add-ons, making bundling everything you need for a professional website easy.
Cons
- Limited Upselling on Hosting: While Namecheap’s hosting is affordable and beginner-friendly, it may not offer as many features or performance capabilities as larger hosting providers. If your site grows significantly, you may need to consider a more robust hosting option.
- Pricing on Some TLDs: While .com and popular TLDs are competitively priced, some niche or newer TLDs can be more expensive. Be sure to check the renewal price before committing.
- Occasional Delays in DNS Propagation: Although this isn’t unique to Namecheap, some users report occasional delays in DNS propagation times, which can mean a bit of waiting when connecting to a new web host.
Purchasing a domain is the first step to building a successful online presence, and Namecheap makes it easy with affordable pricing, privacy protection, and a user-friendly interface.
Next Steps: Learn How to Write Engaging Articles
Writing compelling content is the bedrock of affiliate marketing success. If you’re ready to master the art of creating high-quality, engaging articles that resonate with your audience, don’t miss our comprehensive guide on using ChatGPT to write articles.
In this guide, you’ll discover:
- A step-by-step approach to creating content that converts.
- Practical ChatGPT prompts to enhance your writing process.
- Tips for optimizing your articles for SEO and readability.

With this guide on how to purchase a domain on Namecheap, you’re now equipped to find the perfect domain name, secure it, and link it to your website. Whether you’re launching an affiliate marketing site or building a personal brand, having your own domain establishes credibility and makes it easier for visitors to find you online. If you have any questions or tips to share, feel free to leave a comment below—we’d love to hear from you! Good luck, and happy building!